Showing posts with label Makeup Tips. Show all posts

Wednesday, February 12, 2014

Eye Lining Tricks

Lining your eyes can either make your eyes look gorgeous or tell the world that you haven't quite got the hang of it yet. Here are some quick little tricks to make you look like a pro! Applying Color Below the Lashes

The best tool I have found for applying shadow beneath the lashes is with a sponge applicator. The color sticks to the sponge until it is softly deposited exactly where you want it to be. A brush is about the worst tool you can use for this purpose. No control at all.

How Much To Line

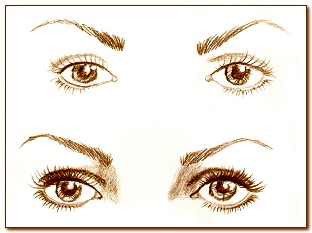
Although some models can line their entire eye, this look is not for everyone. But that doesn't mean that you can't create a look that is close to what you see here. Play around with your liner. Line the upper lid and just the corner of your lower lid. Line the upper lid and leave the lower lid bare. Get into the habit of playing with your makeup. You never know when you will happen upon something absolutely amazing.

Using an Eye Lining Pencil

Don't draw the pencil across your eyelid as this could cause stretching of the skin. Instead, apply the color to the palm of your hand, pick up some of the color with your pinky and apply gently to eyelid.

One Continuous Line?

I would suggest a series of dashes or dots worked into the lash line. It's easier to control and no mistakes to be carefully fixed.

But My Lids are Oily

This is a common problem that causes liner to migrate up into the crease area. To prevent this from happening, choose a product to prep your lid. Not only will this prevent the liner from moving, it will keep your shadow in place at the same time.

How to Curl Your Eye Lashes

Since we can't all be blessed with long lashes, thank goodness mascara can make it look as if we were. Here is a very simple method of applying mascara for every day wear.

Draw wand out of mascara tube and remove the excess on a piece of paper towel or tissue.
Hold wand horizontally and slowly twirl as you move the brush from the roots to the tips.
To set curl, hold wand and lashes together at the tips for a several seconds.
Apply second coat before the first coat has dried to avoid clumping.
Apply mascara carefully to the bottom lashes, holding wand vertically.
While lashes are still wet, comb through the lashes (carefully) with a lash comb to separate each lash.
Tips:


  1. Be sure to wash off your mascara each night. Not only will it smear during the night, you won't be able to apply more until your lashes are free from the old mascara.
  2. Mascara is a breeding ground for germs. Be sure to replace it every three months.
  3. Never pump the wand into the tube. This procedure only adds air to the mascara, drying it out.

Brushing Long Hair Properly


Bend forward, allowing hair to fall. Using only a wooden base natural bristle brush, bring hair from the nape of the neck over the head and down to the ends.

Then, stand straight again with hair falling normally and brush from the underside of the hairline down the strands to the ends.

Now, brush the top layers into place with long, even strokes. After each stroke, smooth hair with hands to reduce static.

Increase the number of strokes weekly, starting with five and increasing by one a week until you find a comfortable routine. If oiliness develops, reduce strokes.

Brush only when dry. Hair is weakest when it is wet and brushing can easily damage it. Even when hair is dry always comb before brushing.

Coloring Your Eyebrows

If, like me, you have eyebrows that are a bit too pale in colour you can easily make them darker.

First get your eyebrows into shape by plucking and brushing. Next, find a powder eyeshadow that matches your colouring and using a brow brush, gently run the colour through your eyebrows.

Don't apply too much, just enough to darken the brows. To keep all the hairs in place, spray a very small amount of hairspray onto the brow brush and sweep that gently through the brows.

I normally use a dark brown colour, as that looks natural with my normal hair colouring. So you may need to experiment a bit to find the correct shade for your eyebrows.

Don't ever use mascara on your eyebrows as it is too thick and will make a mess!

Monday, February 10, 2014

How to apply foundation

There are three basic formulations of foundation: liquid, cream and powder. The formulation you use should depend on a few factors: Do you have a lot of excess shine? Do you have patches of dry, flaky skin? Are there dark circles, blemishes or other areas on the skin you would like to minimize? What texture feels comfortable on your skin?

The right everyday foundation will make your skin look naturally radiant. It should feel comfortable on your skin all day long and not require much maintenance through the day. The current trend in foundation application is to apply only where needed, most likely toward the center of the face, and letting your natural skin shine through wherever possible.

Eye Color Rules


  • Keep deeper colors on the lid.

  • Use lighter colors on the brow bone.
  • For a casual but polished look, sweep one shade from lashes to brow bone.
  • Use cream shadows sparingly -- the colors tend to be very vivid.
  • Eye gloss is the newest trend. It adds a sheer shine to lids, but don't try it unless you know you can carry it off -- it can look greasy and inappropriate.
  • Apply powder eyeliners wet for more intense color.
  • White, pink and yellow eyeliner pencils tend to make the eye look open and brighter. Blue counteracts redness, and black will give you a sultry look.
  • In order to make eyeliner easy to apply, manufacturers sometimes make it so creamy it doesn't stay put. You can use a matching eye shadow or powder liner to set your eyeliner.

Lipstick Tips


  • If you want your lipstick to last, use pencil first as a base. Outline and color in your lips with pencil (nude, if your lipstick .. 
  • Store lipstick -- and perfume -- in the refrigerator. It'll last longer. 
  • Never use a tester on your lips -- it's unhygienic. Test lipstick on your fingertips  instead of the back of your hand: the color and texture are closer to that of your lips. 
  • If you want your lipstick to last, use pencil first as a base. Outline and color in your lips with pencil (nude, if your lipstick shade is light) and slick your lipstick on top. 
  • Your lips will also look softer, "smudgier," and less defined if you don't use pencils or lipliners. 
  • To avoid lipstick on your teeth, after application, run your index finger through the middle of your lips and pull it back out. The excess will come off on your finger, not your teeth. 
  • In a pinch, your lipstick can double as blush. (But never use blush on your lips.) 
  • Outline your lips in pencil before you apply lipstick or gloss if you don't want your lipstick to feather. 
  •  Women over 50 usually look better with a cream lipstick rather than a matte or gloss. Every bit of moisture helps. 
  • If your lipstick shade turns out to be brighter than you thought it would be, color in your lips with a pencil a few shades darker than your lipstick (for instance, brown pencil under dark red lipstick) and layer the lipstick on top. Or coat the lipstick with a darker lip gloss, which will turn down the heat.

Monday, May 6, 2013

Tips for summer make-up.....

Who doesn't love summer with all the pleasures it brings: a lot of sun,the beach&the sea. Unfortunately the heat and the humidity are real challenges for your make-up so some changes must be done in this case.

The first tip in order to obtain a beautiful make-up is to use a make-up basis after hydrating the face and before using the make-up. The make-up basis is light and helps the make-up last more.

Another tip is to use a light make-up. As you are used to wear gauzy shirts and linen trousers during summer, the make-up should also be simple and refreshing. You should replace the hydrating foundation with a solar protection cream. These kind of creams allow the complexion remain fresh and won't permit the appearance of folds on your face. If you feel the need of an additional protection you can use a powder.

Friday, March 29, 2013

Makeup For Teenagers.....

It is first of all in teen age that the craze bugs to look beautiful bites every body. All of a sudden then the world of makeup and fashion starts looking extremely interesting. The craze to experiment with looks specially comes with the entry in college. However, as this age is very delicate, it is often not advisable to apply extra make up. Teenage make up should always be soft and subtle. A nice combination of colors, poise and sweet touch up makes teenage make up attractive and charming.

What kind of make up is advisable for teenagers?
As a teenager you must know that you have got a soft and unexploited skin and you must act wisely to preserve it. Make sure you do not use any local and harsh products on your skin. Also remember not to be a copy cat of makeup applied by people around because as a teenage it is very important for you to develop an original style of your own. Do not also give yourself an overdose of make up because it will make you look more mature than you are. Try to stay away from that ultra glam as it will take a toll over your innocence which is the basic plus point of your beauty.

Make up tips for teenagers

What to do 
  • Experiment with colors. Try wearing bright and floral colors. You can also use light pink and black colors if you are willing for a feminine look. 
  • Go for bright yet natural shades for make up. 
  • Do experiments with your eye make up but avoid extra glossy make up any where else on your face. 
  • Go for lip gloss instead of lipstick. 
  • Try different kinds of hairstyles because changes in hair do help in a complete make over. 
  • Remember to keep your skin clean, toned and moisturized. Avoid using any harsh products on your skin. 
  • Experiment with your footwear. 
  • Innocence on your face is your real beauty, so avoid any kind of make up that overshadows your natural charm and innocence. 

What not to do 
  • Always make sure that you do not overdress yourself and whatever you wear is in accordance with the occasion you are dressing up for. 
  • Avoid extra chemical treatment with your hairs. However experiment as much as you can with natural and herbal products. 
  • Avoid wearing ultra glam dress and make up because that will overshadow the natural charm of your face. 
  • Do not apply chemicals on your face instead go for home made and natural products. 
  • Avoid colors like queen, brown, grey and slate both in make up and dresses.

How to Choose a Moisturizer with Sunscreen for Your Skin

When looking for the right kind of moisturizer for your skin you should consider many things before just going and buying any product off the shelves. These things should be skin type, time of year, as well as cost of the product you are looking at.

Common Facial Skin Types
Oily skin is described as shiny with a dull color to it. Chronically oily skin has large pores and often has blackheads or pimples that can be either large or small. There are many causes to this type of skin a few of which are hormone levels, heredity, diet, and the weather. Natural oils such as Olive oil are actually good for oily skin types, they help break down the bodys oil and replace it with good oil.

Dry skin can be described by a dull flat tight look. This skin type often suffers from a tight itchy feeling and the skin can flake or chap and crack easily. This skin type can be caused by a lot of the same things as oily skin such as heredity, diet, and hormones. 
Combination skin is skin that has both oily patches as well as dry patches and is a very typical skin type for the face. Often the T zone is where the oily patches are; the T zone is the forehead, nose, and chin. Often this area is affected by acne or can be more greasy feeling then the rest of your skin. The dry patches are often the cheeks where they can become so dry some people may experience flaking or chapping. 

Sensitive skin is skin that is thin or fine in texture. If you have sensitive skin you probably have allergic reactions to many products including detergents, cosmetics and alcohol that is used in many skin care products. Sensitive skin burns easily as well as can get windburned more easily. 

Moisturizer Cream & Lotion Products with SPF
Dermatologists recommend that you always use a moisturizer that contains a sun screen. SPF is important to give you the sun protection you need. During the summer months you can even find moisturizers that contain tint for a nice tanned look. 
Some products like Aveno have clearly labeled bottles that tell you what the skin type each different product is best for. Aveno is best for sensitive skin as well as to be used during winter months when dry skin can be at its worst. 

Neutrogena is one of the top recommended products for skin care by dermatologists and can be found in just about any drug store, chain store, or super market. Neutrogena is a product that is especially good for people who suffer from oily skin types or acne that is often caused by oily skin. 

You may also find that some organic ingredients work best for your skin. A natural deep moisturizer is olive oil and is often used even in luxury salons. This is one of the best moisturizers for a deep penetrating facial or all over body moisturizer. Choosing a product that is right for your skin will allow you to save money as well as find the right product for your skin type.

SPF: stands for Sun Protection Factor.

Party Make Up Tips.....

Everyone wants to look good, especially when it is the time to party. The idea behind hosting or going to parties is to meet the people you know as well as to make new friends. At the same time, you try to impress others by your dressing sense and looks, along with the way you carry yourself. The self-confidence comes when you know that you are looking perfect, with the right make up and a dazzling ensemble. However, while getting ready for a night out, you need to know that party makeup also has some limits and rules. For instance, you should apply either heavy eye makeup or heavy lip makeup, but not both at the same time. If you want to be the essence of a party, there is no better place to
start than at your dressing table. In this regard, the party makeup tips given here will come handy.

Prepare Yourself:

Choose your dress, footwear and accessories for the big occasion in advance. Once all the elements come together, it will help you get an idea about your look and you will be able to select your make up accordingly.

For Fresh Looking Skin:
Wash your face with warm water, using your favorite face wash.
Rub ice on your face for 5-10 mins, in breaks.
Dab some cleansing milk on a cotton ball and wipe your face with it.
Apply some lotion/ moisturizer, while making sure you do not end up leaving your face oily.

Preparing The Base:
Depending upon your complexion, apply foundation all over your face, with the help of a sponge/foundation brush. You can apply a darker shade of the foundation on the broader parts of your face.
Now, apply shimmer powder on your face, over the foundation, with the help of a brush.
Blush your cheeks, adding color gradually. Use some blusher on the sides of the forehead and chin as well.

On The Eyes:
First of all, you need to apply the eye-shadow on your eyelids
Define your eyes with eyeliner, making use of short strokes.
Next, apply 2-3 coats of mascara, on the tips of your lashes.
Finally, define your eyebrows with the help of an eyebrow pencil.

For Your Lips:Shape up your lips nicely and precisely, with the help of a lip liner pencil.
Now is the time to apply the lip color, with the help of a brush.
Blot the lipstick with tissue and then apply once again.
Finally, add a coat of gloss on your lips.
For Your Nail:Clean your nails thoroughly and file them to give a proper shape.
Apply a coat of the colorless base coat and let it dry.
Add two coats of a nail polish, giving a gap of 10 minutes in-between.
Add another coat of the colorless base coat and let it dry.

Make Up Tips For Wide Set Eyes....

There are many famous personalities with wide set eyes. The make up tricks for wide set
eyes are very different from the techniques used for other types of eyes. The key point here is to emerge the gap between eyes in such a way that they look beautiful.

First make sure you have wide set eyes or not. If your eyes look far away from each other and there is more then one eye's gap between the two than you have wide set eyes.Now you have to make up your eyes in such a way that they look closer.
First apply a concealer under your eyes if you have dark circles.Apply a lighter tone of base on the whole of your eyes.
Now apply a medium or light color eye shadow on whole of your eye. Use pink, peach or light green color.
Apply contouring shade on the inner corner of the eye it should be along the lash line or apply a dark color of eye shadow on the inner corner very close to your nose and smudge it in the lighter shadow on middle of the lid to the outer corner.
You have to use purple, maroon or brown like colors on the inner corner.You do not have to use any third color but if you add it to mix the light and dark shades of both corners it will enhance the beauty and show professionalism.
Always it should be kept in mind that dark colors on the inner corner of your upper eyelid gives illusion of being them closer.
Now you have to apply eye liner. Line the inner half of your upper and lower eye lid with liner it will bridge the gap of the eyes. If you want a complete line of liner than start with thick line from inner corner in such a way that it becomes narrower on the outer corner.
Now apply mascara on your lashes and curl them.


Choosing Foundation Makeup Type And Color.....

The first step to choosing your own foundation however is to choose not the color but the type of formula you need. There are many different foundation skin products, for all types of face issues. If you have oily skin you may want to go with a cream or powder formula. If you have dry skin or combination skin, a liquid formula might work best. Some people like to add a translucent or opaque mineral powder over their liquid foundation, so keep that in mind while shopping.

In addition to thinking about your skin type, you'll need to think about the coverage you need and your lifestyle. If you have blotchy skin you might need a formula that offers bold coverage but if you simply want to even out your tone a bit, a lighter coverage formula might work better. If you live a very active and sporty lifestyle, you might even want to consider waterproof or stick foundation.

When you are choosing your color on your own, look for yellow based colors because they look most natural on all people. Be sure to look for a shade that somewhat matches your clean jaw line, neck color or the color on the inside of your wrist. A makeup counter expert can help you with this if you do choose to visit the department store. If you buy at a drugstore, some of them will accept exchanges on makeup. So, keep in mind if you don't get the right color the first time you might be able to exchange it for another color.

Applying The Foundation Makeup
When you get your foundation home, sit near a window and try the color on your jawline to be sure it is correct. It should blend in naturally to your skins color and your neck color.

Once you're sure the color is perfect, start by dotting the foundation on your forehead, nose, each cheek and chin. Then using a sponge, blend the dots together until your face is covered. You can choose to do total face coverage in this manner or you can also choose to simply apply the foundation where you need the coverage the most. Either way, the key to getting a natural look is to blend it well. Be sure to blend it completely, leaving no streaks or unnatural looking areas.

Choosing and applying foundation makeup can be difficult but to get the best makeup look possibly, it's important to take the time to learn how to do it properly!

Important Tips For Oily Skin

  • You should wash your face as many times as you can.
  • You should avoid eating fried and cheesy food.
  • You should an astringent instead of milk while cleansing your face. You should apply an astringent before doing make-up. Doing this will lessen the oily look on face.
  • Apply on your face a mixture of cucumber juice and lemon juice mixed in the same proportion.
  • Take a piece of tomato and rub it on your face for removing blackheads.
  • Before food have a lime juice mixed with crushed ginger.
  • Apply a mixture of rosewater, lemon juice and multani mitti on your face and after it gets dry remove or wash it off.
  • Make a mixture of 1 spoon curd,1 spoon tomato juice, 1 spoon multani mitti, 1 spoon honey and little amount of kapur. Apply this mixture on your face.
  • Take a mixture of apple juice and drops of lemon juice and apply on your face. Wash this mixture from the face after 10-15 minutes.
  • Rub your face with ice-cubes and you can also try ice water mixed with lime juice and wash the face with this mixyure

Wednesday, March 27, 2013

Cucumber - Honey Toner

Cucumber - Honey Toner

1 medium - cucumber, peeled and cut into pieces
2 teaspoons - honey

Directions
Puree cucumber in a blender. Line a sieve with cheesecloth and set the sieve over a glass bowl or measuring cup. Pour the cucumber puree through the sieve and let it stand for 15 minutes for the juices to drip into the bowl. Pour the clear juice into a clean bottle and add honey. To use, shake the bottle and saturate a cotton pad with the lotion. Sweep over face, neck and chest morning and night, and let it air dry (about 3 to 4 minutes). Store covered in the refrigerator for up to 1 week. Makes about 1/2 cup.

1.    Cucumber-Honey Toner:
Puree 1 cucumber in a blender, drain and collect the juice. Add 2 teaspoons of honey into the juice and mix. Pour the mixture into a bottle. Apply on the face and neck area with a cotton pad in the morning and at night. Air dry it and rinse clean. Store the bottle covered in the refrigerator for up to 1 week.

2.    Honey-Apple Toner:
In a blender or food processor, combine 1 peeled, cored apple with a tablespoon of honey and pulse until smooth. Apply mixture to face and allow it to stay for 15 minutes, then rinse.

3.    Hot Honey Bath:
Perhaps the easiest natural skin care recipe using honey -- Add 1/4 cup of honey to your hot bath water for silky and luscious skin. This is especially good for dry skin.

4.    Honey Olive Hair Conditioner:
For lustrous, silky, healthy hair and scalp, simply combine 1/2 cup honey and 2 tablespoons to 1/4 cup olive oil. Massage scalp with this conditioner, then put on a shower cap for 30 minutes. Shampoo and rinse as usual. Good for hair revitalising.

Citrus Bath Herbs

Fragrance Bowls: Fill large decorative bowls with clean sand then top with citrus peelings, homemade potpourri, cinnamon sticks and bunches of fresh herbs or fragrant flowers to fill a room with a pleasing, and natural, fragrance.

Fragrant Bedroom Sacks: Fill small fabric sacks about the size of a shoe bag with Homemade Potpourri and tie closed with ribbon to make large sachets. Arrange them with the pillows for a pretty decor effect.

Directions
Mix together and store away for use.

To Use: At bath time you may put a large handful of the mixed herbs into a muslin bag and drop the bag in the hot tub or drop the herbs directly into the water. You can also opt to put the herbs into a perforated metal ball available in the cooking section of department stores and often used in the cooking of rice. You can also make an infusion of herbs and strain the liquid into the tub. 

Citrus Spice Aromatherapy Bath Recipe

Ingredients

1/2 cup dried Lemongrass
1/2 cup Lavender flowers

1/8 cup (2 tablespoons) whole Cloves

1/8 cup (2 tablespoons) chopped or shredded Licorice root (optional)

3 drops Lemongrass essential oil

3 drops Lavender essential oil

3 drops Palmarosa essential oil

Directions

Combine the lemongrass, lavender flowers and licorice root in a dark glass or PET plastic jar.

Using a mortar and pestle, crush the cloves a little to break them into slightly smaller pieces and release their scent. If you don't have a mortar and pestle (I don't!) you can put the cloves in a stong plastic bag and gently hit them with a hammer, or you can grind them in a clean coffee maker - just be careful not to overdo it.

Add the cloves to the herbal bath tea mixture, then drop in the essential oils, placing each drop in its own little spot on top of the mixture. Use a stainless steel spoon to gently stir everything together.

Cap the jar and let it sit for at least 24 hours before using to let the aroma 'cure' (longer is better.)

To use your citrus spice aromatherapy bath recipe, scoop a few spoonfuls into a small organza or muslin drawstring bag. Fill about half full - it will expand in the water.

If you don't have a bag, put a few spoonfuls into the center of a square of double thickness cheesecloth, pull the edges together and tie it closed with a string.

To get the most benefit from your bath, boil a kettle of water, then steep the bag in a bowl of very hot water for 10 minutes or so. (Yes, you're making herbal tea for your bath!)

Pour the herbal bath tea into your bathwater BEFORE YOU GET IN then check the temperature to make sure the bath water is not too hot. Drop the herbal bag in the water, slide in and relax for 20 minutes.

Avocado Carrot Cream Mask

Girls of all ages love to apply beautifying masks. Wendy Allred, training and education manager of New York City's Bliss Spa, shared this homemade version, fun for two great activities — making and applying!

Materials:
1 avocado, mashed
1 carrot, cooked and mashed
1/2 cup heavy cream
1 egg, beaten
3 tablespoons honey

Saturday, March 16, 2013

Highbrow Style

When they look good, you look gorgeous, so show your eyebrows some love.
Poor eyebrows! They are the true Cinderella of the face. While the eyes and the lips get to go to the ball, dolled up in all their finery, more often than not, the brows are left neglected and unloved. Big, big mistake. Brows are incredibly important. The brows lift and frame the face. They pull everything together. In fact, a well-groomed, well-defined brow can do so much to a face that you actually need less make-up. By the same token, bad brows can wreak havoc on the prettiest face. If you get your brow shape wrong, your whole face will change; you can go from looking chic to cheap. What shape is right? Generally, a variation on the brow shape you were born with. It may be fashionable for brows to be thicker right now.The Glamour BrowBut it's like everything if you follow fashion extremes, things can go horribly wrong. So be aware of what's in, but do what suits your face. A classic brow shape that's right for you will never go out of style.
The Glamour Brow
Also known as everyone's fantasy eyebrow. It's a classic made-up brow. It's thick and groomed, arched and elegant; this is going to look good
on anyone.
Do It Yourself: Use pencil if you're confident, and powder if you're not. Draw a defined arch and blend outwards from there. Put on more colour than you would during the day. And make sure that the outer edge is defined but tapered." Fill in gaps with feathery strokes, fading to nothing nearer the nose. Finish with a lick of brow gel. Gel adds gloss, which ups the glamour. Work it intoThe Uber Browhairs from root to tip, then brush upwards along the top of the arch.
The Uber Brow
This is the brow at its most high fashion. It's very dark and very graphic. It's not even attempting
to look natural. Suitable candidates for this look: anyone with decent-sized brows. Mingy eyebrows need not apply.
Do It Yourself: Brush the hairs out of the way and start filling in the base of the brows with a damp brush dipped in eye-brow powder. Get the powder right onto the skin beneath hairs. Brush the brows back into place and then continue using your wet brush and powder to coat over the hairs. "Go nearer to the nose than youThe Glamour Brownormally would. Even fill in the arch you want a strong. Straighter, graphic brow.
The Wild Brow
Eat your heart out. These are my very youthful, sensual and luscious.
Do it Yourself: The starting point is pretty much virgin brows. Then it's all about grooming. Brow gel really comes into its own here. Coat each hair from root to tip and brush in the wrong direction to create volume. Finish by brushing brows straight up and sweeping the brush along the top edge to join them together. There's not a bit of pencil or powder in these brows. You just want them to look glossy, healthy and dewy.
Making Up Brows
Not many of us have perfect brows, even after plucking. Often the arch is a bit sparse, or you have gaps, or the brows are asymmetrical. Filling gives the brows more impact, definition and length. Here's how to do it like a pro…
Pick Your Weapon: Make-up artists favour pencils but amateurs can find them tricky to use. If you're a beginner, shadow is an easier option.
Choosing The Right Colour: It is the most important thing with pencils and powders. To look natural it needs to be as close to the natural shade of your brows as you can manage. Generally, it needs to be no more than two shades darker than the hair on your head.
Start With The Arch: Draw a soft arch (not too pointy), then fill in the gap between it and the rest of your brow. Now decide if the front of the brow needs filling. Be careful, never go to heavy near the bridge of the nose start a little way back.
Vary Your Technique: Keep strokes feathery near the nose. When you're doing the arch and down the
outer edge, you need light but
longer strokes.
If You're Using Shadow: A damp brush will give a darker colour and stronger shape. A dry brush will give a softer cloud of colour.
Top 4 Brow Crimes
1. Over-plucking
Quite simply, brow crime numero uno. The two main offences? First, the 'tadpole' where the middle section has been over-plucked, leaving a heavy section by the nose. It's a very inelegant shape. Second the 1930s brow, where the whole brow is plucked to a scary skinniness. It's not beautiful, it's too harsh and you'll just look surprised.
2. Mono-Brow
Artist Frida Kahlo and actress
Kajol might have made this their trademark, but don't make it yours. A thatch of dark hairs between the brows is unflattering as it will
close your face. So pluck or thread into oblivion.
3. Shaving
Don't go there, even if you have brows like a sheepskin rug. Even the most unruly brows can be tidied without resorting to the razor.
4. Unkemptness
Most brows need a little brushing and plucking to get them into shape. Four or five hairs could make all the difference. A bit of gentle plucking in the right place will transform
your face.

Monday, June 11, 2012

How to Strengthen Your Eyelashes


At one point or another, every woman dreams of being able to maintain movie star quality eyelashes. This is not such an easy feat however, and along the way woman often will weaken or cause damage to their lashes, trying to obtain that perfect look. There are things that you can do to ensure that your lashes remain healthy and to make them stronger as well.